Base Stats
Abilities
Type Matchups
View full type chart →Damage multipliers vs. normal typing. Ability-based immunities (e.g. Levitate) are not included.
Battle & Lore Hub
Battle Strategy
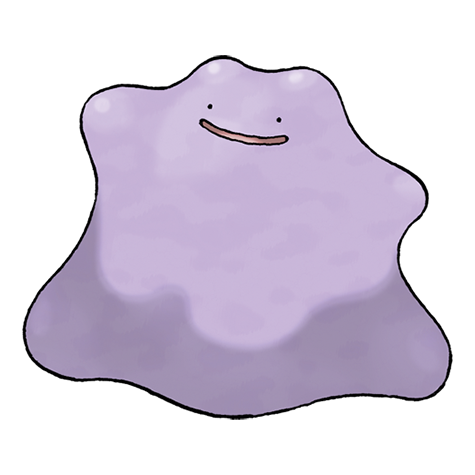
Ditto functions as the ultimate revenge killer and anti-setup sweeper by utilizing the Imposter ability to copy the opponent's stat boosts and movepool. It relies on the Choice Scarf to ensure it outspeeds the target it has transformed into, effectively turning the opponent's offensive momentum against them.
Best Used In
Ditto excels in Gen 9 OU and Ubers as a check to powerhouse legendaries and setup sweepers like Zacian-C or Calyrex-Shadow. It is also a common 'anti-meta' pick in VGC formats where high-statisitic restricted Pokémon dominate.
Strengths
- ›Perfect scout for enemy movesets and items
- ›Punishes setup sweepers by stealing their boosts
- ›Infinite versatility as it adapts to any opponent
- ›Effective revenge killer with Choice Scarf priority
- ›Psychological pressure during Team Preview
Weaknesses
- ›Extremely low base HP (48) which it retains after transforming
- ›Useless against Substitute or Illusion (Zoroark)
- ›Locked into one move due to mandatory Choice Scarf
- ›Limited to 5 PP per move in Transformed state
- ›Fails to transform against Terastalized Ogerpon or Terapagos
Competitive Tips
- ›Always run 0 IVs in Speed and a Relaxed nature to ensure you win the Struggle war against opposing Ditto.
- ›Equip Choice Scarf to guarantee you outspeed the opponent you are copying, provided they aren't also holding one.
- ›Switch Ditto in immediately after a teammate faints to safely activate Imposter without taking chip damage.
- ›Use Ditto to scout if an opponent is holding a specific Choice item or has a hidden coverage move.
- ›Be wary of entry hazards like Stealth Rock and Spikes, which significantly cut into Ditto's limited HP pool.
Recommended Teammates
Corviknight
Provides Defog support to keep Ditto healthy and can slow pivot with U-turn.

Blissey
Acts as a massive special sponge that can pass Wishes to heal Ditto's low HP.
Garchomp
Sets entry hazards that punish the switches Ditto frequently forces.

Clodsire
Absorbs Toxic and sets Spikes while walling the Electric types Ditto hates.
Ting-Lu
Provides exceptional bulk and Whirlwind to phase out substitutes that block Ditto.
Game History
Introduced in Generation I, Ditto was initially a gimmick due to the manual turn requirement for Transform. Its competitive viability skyrocketed in Generation V with the introduction of its Hidden Ability, Imposter, which allows for instant transformation. It has since remained a staple niche pick in every subsequent Smogon and VGC meta as a safety net against 'hyper offense' teams.
Trivia
- ◆It is the only Pokémon capable of breeding with almost any species regardless of gender.
- ◆In the Pokémon Yellow opening, Ditto can be seen briefly before transforming into Pikachu.
- ◆A long-standing fan theory suggests Ditto is a failed clone of Mew due to their identical weight, color, and move capabilities.
- ◆In the anime, Duplica's Ditto initially could not change its face, leading to the iconic dot-eyed transformation look.
- ◆Ditto is the only Pokémon that can naturally learn exactly one move via leveling up.
- ◆In Generation I, if a Transformed Ditto was burned or paralyzed, it would retain those stat drops even after the battle ended.
Moves · 1 total
Other
1 movesWhere to find· 34 games
Red
7 spots- •Cerulean Cave 1f
- •Cerulean Cave 2f
- •Cerulean Cave B1f
- •Kanto Route 13
- •Kanto Route 14
- •Kanto Route 15
- •Kanto Route 23
Blue
7 spots- •Cerulean Cave 1f
- •Cerulean Cave 2f
- •Cerulean Cave B1f
- •Kanto Route 13
- •Kanto Route 14
- •Kanto Route 15
- •Kanto Route 23
Yellow
4 spots- •Cerulean Cave 1f
- •Cerulean Cave 2f
- •Cerulean Cave B1f
- •Pokemon Mansion B1f
Gold
2 spotsSilver
2 spotsCrystal
2 spotsRuby
PokédexIn this game's Pokédex — wild location data unavailable.
Sapphire
PokédexIn this game's Pokédex — wild location data unavailable.
Emerald
1 spot- •Desert Underpass
FireRed
7 spots- •Cerulean Cave 1f
- •Cerulean Cave 2f
- •Cerulean Cave B1f
- •Kanto Route 13
- •Kanto Route 14
- •Kanto Route 15
- •Pokemon Mansion B1f
LeafGreen
7 spots- •Cerulean Cave 1f
- •Cerulean Cave 2f
- •Cerulean Cave B1f
- •Kanto Route 13
- •Kanto Route 14
- •Kanto Route 15
- •Pokemon Mansion B1f
Diamond
1 spotPearl
1 spotPlatinum
1 spot- •Trophy Garden
HeartGold
7 spots- •Cerulean Cave 1f
- •Cerulean Cave 2f
- •Cerulean Cave B1f
- •Johto Route 34
- •Johto Route 35
- •Johto Route 47
- •Johto Safari Zone Wetland
SoulSilver
7 spots- •Cerulean Cave 1f
- •Cerulean Cave 2f
- •Cerulean Cave B1f
- •Johto Route 34
- •Johto Route 35
- •Johto Route 47
- •Johto Safari Zone Wetland
Black
1 spot- •Giant Chasm Forest
White
1 spot- •Giant Chasm Forest
Black 2
3 spots- •Giant Chasm Forest
- •Giant Chasm Forest Cave
- •Giant Chasm Hidden Grotto
White 2
3 spots- •Giant Chasm Forest
- •Giant Chasm Forest Cave
- •Giant Chasm Hidden Grotto
X
2 spots- •Friend Safari Normal
- •Pokemon Village
Y
2 spots- •Friend Safari Normal
- •Pokemon Village
Omega Ruby
2 spots- •Mirage Spot Cave North Of Route 132
- •Mirage Spot Island Route 132
Alpha Sapphire
2 spots- •Mirage Spot Cave North Of Route 132
- •Mirage Spot Island Route 132
Sun
1 spot- •Mount Hokulani Main
Moon
1 spot- •Mount Hokulani Main
Ultra Sun
5 spots- •Alola Route 9 Main
- •Alola Route 9 Police Station
- •Konikoni City
- •Mount Hokulani East
- •Mount Hokulani West
Ultra Moon
5 spots- •Alola Route 9 Main
- •Alola Route 9 Police Station
- •Konikoni City
- •Mount Hokulani East
- •Mount Hokulani West
Let's Go, Pikachu!
7 spots- •Cerulean Cave 1f
- •Cerulean Cave 2f
- •Cerulean Cave B1f
- •Pokemon Mansion 1f
- •Pokemon Mansion 2f
- •Pokemon Mansion 3f
- •Pokemon Mansion B1f
Let's Go, Eevee!
7 spots- •Cerulean Cave 1f
- •Cerulean Cave 2f
- •Cerulean Cave B1f
- •Pokemon Mansion 1f
- •Pokemon Mansion 2f
- •Pokemon Mansion 3f
- •Pokemon Mansion B1f
Sword
PokédexIn this game's Pokédex — wild location data unavailable.
Shield
PokédexIn this game's Pokédex — wild location data unavailable.
Green Japan
7 spots- •Cerulean Cave 1f
- •Cerulean Cave 2f
- •Cerulean Cave B1f
- •Kanto Route 13
- •Kanto Route 14
- •Kanto Route 15
- •Kanto Route 23
Red Japan
7 spots- •Cerulean Cave 1f
- •Cerulean Cave 2f
- •Cerulean Cave B1f
- •Kanto Route 13
- •Kanto Route 14
- •Kanto Route 15
- •Kanto Route 23